There is nothing like the scent of pine amidst the quiet of an alpine lake or a clear sky speckled with stars against snow-capped mountains. But even the most spectacular sights won’t make up for a miserable night camping in cold weather or freezing temperatures. Whether you’re cross-country skiing or backpacking by snowshoe, don’t be ill-prepared. Get the gear you need to stay warm and endure those subzero winter extremes. Here’s how to make your adventure more about comfort and less about battling the cold.
- Closed-cell foam sleeping pad
- Coupler strap (and a buddy)
- Sleeping bag with an appropriate lower-limit temperature rating
- Synthetic or wool base layers
- Socks, gloves, and a technical cold-weather hat
- Grooved wind-resistant tent stakes
- Nutrient-dense snacks
- Reusable straw
- Tent brush
- Urination device (FUD) for the ladies
- Bottle insulator
- Stainless steel water bottle
Camp Like a Cold-Weather Pro
1. Always Check Weather Conditions and Hazards
Know before you go. This is the golden rule for any outdoor activity: check the conditions. Besides knowing the extreme temperatures you may be up against (think cold-weather desert fluctuations), stay on top of approaching weather systems and weather trends for the season and region, and research recent changes in terrain, trail closures, or similar hazards. Consider contacting the closest ranger station to stay current. Always establish a trip plan and inform appropriate parties of your whereabouts and anticipated return.
2. Secure Your Campsite and Flatten Your Sleeping Surface
Once you’ve secured a location that’s reasonably dry, flat, and protected from the elements, set up your tent. If conditions allow, clear away any snow to expose the dirt and flatten the site with your tools or boots. Climb into your tent, and use your knees to smooth out the ground area were you’ll be sleeping. “Don’t wait until later to do this,” says polar explorer and all-around cold expert Eric Larsen. “Once the snow melts and refreezes, it’s hard to manipulate. I also create a shallow trough for myself so I don’t roll around.” This shaping technique helps to reduce ambient space and potential heat loss from cold exposure, which could make for a miserable night or subject an individual to the early stages of hypothermia or frostbite.
How Does Your Body Lose Heat?
- Evaporation: Evaporation causes a cooling effect. The body loses 85% of its heat through sweating during intense exercise. Wet clothes from sweating and increased respiration also trigger a drop in body heat.
- Radiation: Radiation causes heat to move away from the body. The body may lose more than 50% of its heat from radiation at temperatures lower than 68°F (20°C).
- Conduction: Conduction is the transfer of heat from physical contact. Conduction occurs at 68°F (20°C) and is responsible for the loss of body heat from sleeping on the cold ground.
- Convection: Convection occurs when a heated fluid (liquid or gas) travels away from a source. Take the example of a hot cup of tea. The rising steam coming off of the cup indicates the movement of heat as hot water transitions into gaseous water (wet steam).
3. Bring an Insulated, Closed-Cell Foam Sleeping Pad
Conduction is the culprit for the heat loss that occurs when sleeping on the cold ground, and even a “warm” cold-weather sleeping bag is a cold bag without a quality, insulated pad underneath it. Most self-inflating air mattresses only insulate down to about 30°F, so if you want yours for comfort, lay down a closed-cell foam pad (or CCF) first, like the Therm-a-Rest Ridgerest SOLite Solar (Figure A). This aluminized, coated pad is highly durable and has a lightweight build—we’re talking under 19 oz—and its R-3.5 rating (detailed below) is sure to keep you insulated. Simply throw your self-inflating mattress on top. Some backcountry experts even recommend layering the CCF pad on top of your air mattress.
An R-value refers to to the ability of an insulated material to resist the conductive flow of heat. The higher the R-value rating, the more effective a sleeping pad is at thermal insulation. As always, field testing is the only tried-and-true method when it comes to backcountry gear. Factor in critical features such as a sleeping pad’s weight, compressibility, and comfort before making your purchase.
4. Insulate Your Tent by Reducing Ambient Space
- Buddy Up: Put your partner’s sleeping pad close to yours, or better yet, further reduce ambient space and connect your pads with the Big Agnes Sleeping Pad Coupler Strap.
- Think Like a Pack Rat: Place your stuff sacks and extra gear around the tent’s inside perimeter to further insulate.
- DIY Radiant Barrier: Create a radiant barrier by duct-taping a space blanket (also commonly known as a Mylar blanket, emergency blanket, or shock blanket) onto your tent ceiling. They’re cheap and can be a lifesaver—literally. If you experience excessive condensation inside your tent in the mornings, however, give the space blanket tip a pass. Excess moisture is the doom of all camping gear.
Check out some additional basic winterizing tips for camping in the snow.
Does Body-to-Body Warming Work?
Yes, body-to-body warming is certainly effective for staying warm in cold-weather conditions and for preventing heat loss. Let’s take a lesson in thermodynamics: The greater the difference in temperature, the faster the rate of heat transfer. By decreasing the body’s area of exposure to cold air and increasing the surface area of exposure to warmth (a camping buddy), two individuals can decrease the rate at which they’ll lose body heat.
5. Warm Up With a Hot Water Bottle
If you put a hot, non-insulated stainless-steel water bottle in your sleeping bag at night, it will radiate heat like a sauna stone (Figure I). Try tucking your makeshift heater next to one of these critical areas: your core, your inner thigh (near your femoral artery), and your neck (near your jugular).
Not a fan of stainless steel? Opt for a BPA-free material. Unfortunately, harmful chemicals may leach into water when a material is heated, that’s why 100% stainless steel bottles are preferred. A word of caution: Not all metal water bottles are stainless steel, so check the tags. Look for #304 or 18/8 food-grade stainless steel.
6. Stash Your Boot Liners in Your Bag
With the possible exception of skipping your morning coffee, nothing hurts more than ramming your feet into frozen boots in the morning. Your body prioritizes warming your core, so keep your hands and feet warm to conserve energy. Invest in a synthetic blend or high-quality wool sock for moisture reduction and odor management. (Don’t forget the gloves!)
7. Don’t Breathe or Burrow Deep Into Your Bag
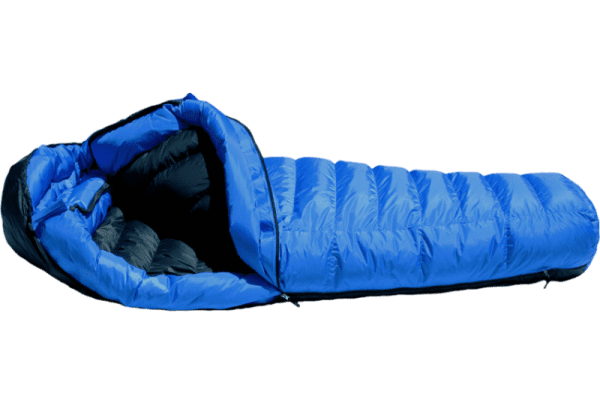
“Moisture from your breath will get trapped in the bag,” says Larsen. “Instead, cinch the draft collar and close the hood down around your mouth and nose so you have a blowhole to breathe through” (Figure D). This is especially true if you use a down sleeping bag. Remember: Condensation is the death of a down bag. A wet bag significantly loses its insulation and takes time to dry, which is sure to put a damper on your adventure. Achieve maximum loft or fluffiness by shaking your bag upside down. This technique redirects the down back to the upper half of the bag near your core where heat retention is most critical.
8. Wear the Right Clothes for Sleeping in Cold Temperatures
Some people say that sleeping naked in a sleeping bag will keep you warmer. This is simply not true. For temperatures below 30°F, be sure to outfit yourself in appropriate base layers:
- Avoid tight-fitting clothing (socks, underwear, gloves) that may restrict blood flow to your extremities.
- Avoid running too warm (moisture will get trapped in your bag and will cause an overall drop in body temperature as you cool off).
- Wear synthetic fabrics or wool.
- Consider warm socks, fingered gloves, and a cozy cap.
If you run warm, you may want to use a vapor barrier to prevent your perspiration from reaching the down in your bag. If you are waking up to recurring condensation, ventilate your tent with a small opening. Hot or cold, whatever you do, dress for the occasion and leave your cotton clothing at home.
Why Is Cotton Clothing Bad for Camping?
Backcountry experts say that cotton kills, but why?
Moisture-wicking materials such as merino wool, polyester, and polypropylene are designed to redistribute moisture via capillary action, whereas cotton becomes easily saturated much like a sponge. To stay warm, avoid silk and cellulose fibers like cotton, layer strategically, and opt for synthetic fabrics.
9. How to Manage Tent Camping on High-Wind Nights
High winds? Sleep in shifts. “Someone will have to check the tent’s rigging every few hours,” explains cold-weather expert, Finnegan. “If you wait too long to tighten a line [because you don’t want to leave your warm bag], the damage to the structure will be impossible to control.” Think about it: The less surface area gusty, cold air and wind have to push against your rigging, the better. Opt for a tent with a maximum wind rating if you like to adventure in terrain with unpredictable wind.
If the wind direction is steady, work with it: Direct the narrowest face of your tent into the wind to decrease exposed surface area.
Consider bringing grooved, wind-resistant stakes if gusts are a real concern. If a tent loses functionality, it can be a huge financial loss and put your safety on the line.
10. Munch on a High-Calorie Midnight Snack
“If I wake up cold in the middle of the night, I wolf down Strawberry Clif Shot Bloks to fuel my engine,” Larsen says. Your body runs on fuel, so fuel it up. Go for sugars, fats, and carbohydrates. The closer you can eat to bed time, the better, especially if your meal is rich in fat. Your body metabolizes protein before fat and takes longer to metabolize fat than carbohydrates, so opt for calorie-dense foods like chocolate, cheese, and nuts. A warm meal requiring minimal prep right before bed will give your body an added boost.
11. Prevent Spills on Your Dry Gear—Try a Reusable Straw
Nothing would be more frustrating than spilling liquid on your dry gear (second to dehydration). Hydration is a must, so keep a reusable straw near your water bottle for no-mess drinking in the middle of the night. Opt for a material that is highly durable and easy to disinfect, such as stainless steel. Some backpackers even use straws to transport spices for their cooking needs. Simply load the straw with a desired spice, seal up the ends, and voila! You’ll be cooking gourmet meals in no time. (Note: Make sure your cayenne pepper is out of the straw before trying to drink out of it.)
12. Remove Morning Frost From Your Tent
Water vapor often condenses on a tent’s inner wall even with the door cracked. Once the ice melts, it will soak your gear. Control frost by keeping your gear covered or inside garbage bags and sweep (with a tent brush) ice crystals into collectable piles before they melt. Remember to dry out your gear daily if conditions permit. If you’re hanging out for the day, invert your tent and let any sunshine or dry wind remove outstanding moisture.
If nature calls in the middle of the night, don’t procrastinate; this makes you colder in the long run because your body has to burn calories to keep urine warm. Too cold to drop trou? Guys should consider using a designated pee bottle (Item G) (mark it with tape or some other distinguishable feature).
For ladies, modern relief gear can make going in the cold a less chilly proposition; check out our review of the best pee funnels for women. Feeling thrifty? Make use of a wide-mouthed jar. Pro tip: Try practicing your technique in the shower so that you can have a few practice runs before showtime.
Harsh times call for harsh measures, and your warm pee jar (and lost body) heat can be used for passive warming—just make sure to tighten the lid and check for leaks. Jars can also be emptied and repurposed to pack out waste or feminine hygiene products.
14. Insulate Your Water Bottles
In high altitude and in extreme weather, you’re at a greater risk of dehydration. Frozen water not only drops body temperature but makes rehydration difficult. “I use Granite Gear’s Air Coolers to keep my water from freezing at night,” says Larsen (one-liter size, $22). These insulators reflect 95% of radiant heat and will insulate hot drinks and soup. Keep your core body temperature up and stay hydrated by sipping on something warm.
15. Protect Your Electronics From the Cold
Cold weather can drain battery power fast, or even worse, permanently damage electronics. Stow your electronics, batteries, fuel canisters, and anything else you don’t want to freeze in the foot of your sleeping bag (buy a sleeping bag with a little extra length for this purpose). Your electronics have maximum and minimum storage and operating temperatures, so it’s wise to check these out before heading into the wilderness. Operating or charging an electronic device outside of its specified temperature range can cause irreparable damage.
Don’t Put Yourself at Risk of Hypothermia and Frostbite
You’re all amped to get out and go, but there’s something else to cover before you hit the snowy wastes: safety. As every backcountry expert knows, no one is immune to cold. It’s important to not only equip yourself with necessary gear for your mission, but to equip yourself with the necessary knowledge for your safety and survival.
What Are the Signs and Symptoms of Moderate to Severe Hypothermia?
You’re extreme and you expect to be cold, but when is cold too cold? Our bodies regulate best at 98.6 ºF (or 37 ºC), so hypothermia is a real risk when our core temperature drops below a safe level. Here are the signs and symptoms of moderate to severe hypothermia:
- Shivering that eventually ceases as condition worsens
- Poor and worsening coordination
- Slurred speech
- Confusion and impaired cognition
- A thready or weak pulse
- Drowsiness and lethargy
- Bradypnea or slowed breathing
- Shallow breathing
- Apathy
What Are the Signs and Symptoms of Frostbite?
Frostbite commonly affects the fingers, toes, ears, nose, chin, and cheeks. Exposed skin in extreme wind or cold is most susceptible to frostbite, although unexposed skin may also be susceptible.
- The Early Stage of Frostbite: The first stage of frostbite, known as frostnip, is reversible and will not cause severe damage to tissue. This stage is characterized by paleness, mild tingling, and numbness of the affected areas.
- The Intermediate Stage of Frostbite: The second stage of frostbite is called superficial frostbite, during which skin remains soft but mild damage has occurred. Skin discoloration may be visible, and water blisters may appear after rewarming in the first 24-48 hours.
- The Advanced Stage of Frostbite: Severe frostbite is a medical emergency and is characterized by hardened, cold skin, the loss of sensation, permanent nerve damage, and cell death. Affected skin may be blue or black. Severe cases may require the amputation of affected areas.
First Aid Treatment for Frostbite
- Get immediate help
- Transport the individual to a hospital ASAP
- Relocate to a warm, sheltered area
- Elevate the affected area
- Do not walk on affected toes or feet
- Remove cold clothes
- Do not massage the affected skin
- Give the individual a warm beverage (no alcohol)
- Apply sterile, dry first aid dressing
- Use first aid dressing or cotton balls to separate the affected digits
- Do not rewarm the affected area if at risk of refreezing
- When safe, use body heat or warm water (not hot) to rewarm the area
Bonus Tip: A Few Words of Encouragement to Get You Amped
Dear cold-weather backcountry campers: you know you are. You froth at the sight of an ominous summit and stare out your work window at the trees, envisioning pines and high altitude. Your best memories are spent watching rainbow trout jump at dusk, or perhaps you crave the sound of soft snowfall on a silent night. You are a child of nature, and adventure feeds your soul. Whatever you do, wherever you go, play it safe, keep it smart, and remember to trust your intuition.


